Monday, September 3, 2012

Keeping a couple of little secrets


Have you ever had to keep a little secret?  I have been sitting on two for the past few weeks and I call now finally share them with you.  The two items that I have made have now been safely delivered to their new homes.


The first up is a lovely new Mumma bear for Little B. 


Coming from Melbourne where layering your clothing is everything due to our 4 seasons in one day weather trick I decided that she needed another layer so a little crochet cardigan was made.  As Little B is only 1 yrs old, I needed to make something that didn’t have any hard pieces, like buttons for eyes, so when I came across this pattern in 'Softies', I knew it was perfect.


Little B’s Mum is one very clever lady who makes the most beautiful mermaid and mermen softies so I thought another style of softie might be a suitable present.  Check out Little B’s Mum’s softies here.


(Full credit to those out there who make softie toys especially if they require many limbs.  I struggled with the sewing of the limbs, trying to fit them all in so that when you turn the bodies right way out everything was sewn in place.  I must have unpicked the limbs at least 4 times as every time I tried to sew them, they slipped out of place and were not connected properly). 

 
My other little secret was a birthday present for my niece Little C.  Last year I made her this little doll, so this year I decided that I needed to make something that she could use with the doll.  I knew that she had a little wooden cradle for her dolls but nothing to put in it, so I made a blanket and sheet set.


I knew I wanted to make a crochet blanket for the top but was unsure on what pattern or style.  I then came across this pattern on my favourite place Pinterest.  As soon as I saw it I was hooked, I knew it was the one.  So off I went following the links only to find that the whole pattern was in French.   My experience of the French language ended in year 8 as I had an argument with the French teacher as to why I didn’t want to be in her class anymore.  She tried to tell me that art (which I was dropping her class for), was not a proper subject and it would never get me anywhere (I then went on to be a Secondary school Art/textiles teacher). 

So what was I going to do?  A couple of the clever ladies in my craft group suggested that I Google translate the pattern.  I tried that and I think a lot of the detail was lost in translation as it made no sense at all. I then decided to just give it a go myself, making a row, seeing if it looked right, if not undoing it and then trying again.  And here it is the finished product.  As you can see I also made a mattress, sheet and pillow to go with it.

I am so excited to be sharing these with you as I have had to keep them a secret for soooooooo  long.

Do you ever struggle keeping secret gifts a secret?


Anna
XO

Wednesday, August 22, 2012

A little bit of Green


I thought I’d take a little break from crafty stuff and show you something else that I have made.  Not so much wool and thread but still creative in its own way.


Of late it has seemed that everywhere I look there are terrariums here and there.  I can’t seem to go on Pinterest without seeing something up cycled into a terrarium.  The below pictures I have been drooling over.


I love the odd assortment of different size jars. Link can be found here.

I love this container! It's so different to what else is out there.
Link can be found here.

I love the simplicity of this one.  Just a jar full of moss but it's still so pretty.
Link can be found here.

So I took it as a sign and decided that I was going to give it a go, with the ever present helping hands of Little O.


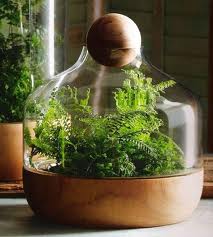
I already had a fish bowl vase that I knew would be perfect, all I need was to gather some supplies.  A little soil here, some pebbles there, and a lovely little expedition trip into the garden to find plants that we could use.  In the end we decided that some moss, miniature mondo grass and baby tears would suit our little vase.

And here is the final product...


It sits in our entrance way and Little O looks at it every day proudly.  He does get very excited when it’s time to water it (which we have had to limit the amount of times we do this otherwise it truly will end up like a fish bowl full of water).

Fingers crossed we are able to keep it alive J

Anna
XO

Monday, July 9, 2012

Wyreena Goodies

Once again I have been very lucky to be able to display (and fingers crossed possibly sell) some of the things that I have made at Wyreena Community Arts Center in their gallery.  This time I have tried to mix it up a little and make some new things. A little bit of crochet, knitting, sewing and with my new love of power tools, some crochet hooks.

Here's a sneak peak at my window display.


If you are in the area please come on down and have a look (they also make the best coffee there too).


Anna
XO


Some of you might have noticed there has been a little bit of action on my side bar lately.  I have finally set up and Esme Rudy Facebook page.  Here I am, http://www.facebook.com/EsmeRudy  So if you prefer to follow things via Facebook this is now an option.  At the moment I know it looks a little messy on the side bar but hopefully soon I will get to tidying it up a little (my slightly OCD side of me is horrified at how it looks, all code like and not one bit pretty or neat, deep breaths and small steps at a time).

Tuesday, July 3, 2012

Hook'in Goodness

Over the past few weeks I have been making a special little project, this time not for anyone but for me.  And not for a specific purpose in mind but just to see if I can actually do it.  I have been out hunting and gathering (well maybe not so much the hunting, but definitely the gathering) and I had several attempts at it by myself but just couldn’t get it right so I had to enlist in the help of a friend.  I am very grateful to this friend as he lent me something I think most of the male species hold very dear to their heart... he lent me one of his power tools.  And as my Dad said he must trust me very much as I think men don’t even like lending their tools to other men.  So one afternoon with a bit of guidance (and Little O being babysat) I busted open this baby and had a go and I think I’m addicted.


I don’t even know what this tool is but I love it, it cut, sanded and polished all in one and the tiny little polishing tools made my life so much easier.

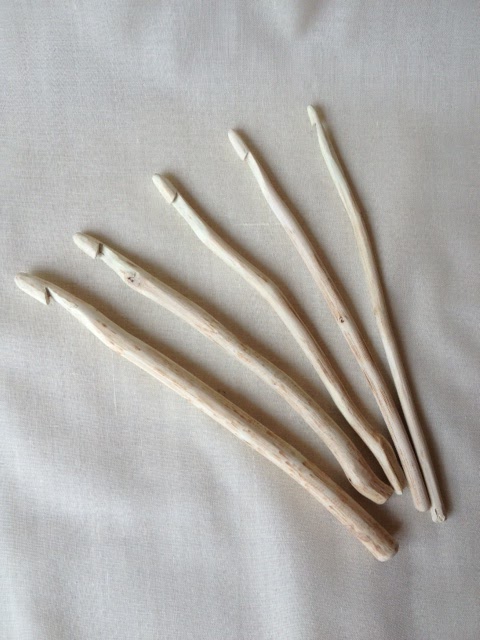
And here is the finished product.


I actually made my own crochet hooks (picture big smile across my face).  I am very impressed with myself that I have managed to actually make these using a power tool and have come away with all my fingers and toes still intact.  I’m the type of person who gets paper cuts from opening a book (yes that actually happened).  So now I am in two minds about whether I oil them in some way or just leave them as they are. They are made out of eucalyptus so I’m not sure what would be the best for them.  But then I do love the look of the natural wood. Decisions, decisions...


Anna
XO

Oh, if you are interested in having a go at making your own,I found this link on Pinterest.  http://www.livingcrafts.com/blog/woodwork/carve-crochet-hook-from-twig

Sunday, July 1, 2012

A little bit of pink

I love making stuff for other people especially when I know that they really appreciate.  In the past I have mentioned that I have made a few things for a friend of mine, J.  A little while back she asked if I could make something for a little girl, something that was pink.  Now I’m not a pink kind of girl.  Growing up the only colour I wanted my bedroom to be was blue and as soon as I moved into my own house with Mr C the first thing we did was paint our bedroom blue.  So I saw this request as a bit of a challenge. There are so many different pinks out there it can be a little overwhelming.  I think I went through all my stash several times and still couldn’t decide on a pink.  In the end I did manage to find a colour that I liked (and maybe because it had a slight tinge of peach in it that I felt ok with it).  So all this talk of yarn you must be wondering what it is that I made...

... a cute little beanie and cover set.

I think the little bow just finishes it off nicely.  A nice little find in the fabric stash.

Again I seem to be having trouble with my images.  I take the photo the correct way but for some reason blogger decides to turn them when loaded and I can't figure out how to reset this, does this happen to anyone else?  So sorry for the neck pain.

I must give my friend J full credit she was able to give me good guide lines on exactly what it is that she wanted otherwise I could still be here swooning with ideas of what to make.  J was able to lead me to this pattern for the cover and the beanie pattern was found here.  Both patterns were such a breeze to follow and they really came together quite quickly (although I kind of got a little distracted watching Tru Blood while making the beanie as I managed to do 2 rounds before I realised that I had forgotten to go through the back loop only, whoops!).

I love the feeling of a finished project but I love even better the thrill of a new one, now what next?

Anna
XO

*** I was just going through my photos and found this...


A nicer way to view them, less stress on the neck :-)

Monday, June 11, 2012

A month in review...May

Just a little visual something to share with you all in this post.  I felt like I didn't achieved much in May but looking back on it now through my pictures I was a little busy.


This beanie won a prize for "Best Autumn" themed beanie over at Little Red's Craft Cupboard (which is a fantastic local craft shop run by Kate.  Kate also has a blog by the same name).


A cushion for my nephew's bed (not happy with how the iron on interfacing buckled when I ironed it on).  I told my sister in law I would re-do it and she laughed at me. In her words "he's not going to noticed, he's 5 yrs old, he's just ecstatic that he has a cushion with his name on it to show to all his friends".  Boy to be that young and made happy by the smallest things.


A special little present for a little girl moving into a big bed
(out growing the cot).


A hot water bottle cover for my Mum (a felted jumper found at an op shop).
Mum has a thing for the colour green and it suits her just perfect.


And finally a special bit of knitting for a very special little boy.  Dear Master M, may this keep your little head warm while you stay in hospital.

For the life of me I just can't get this picture to go the right way.  Every time I upload it, it wants to turn on it's side.
I love this pattern for this beanie, a great Ravelry find.  It is such an easy one to knit up, even with all the distractions a 2.5 yr old can throw in the mix.

So this was my month of May and June is looking to be a busy one too.  As busy as I get I must admit I do love every part of the creating and making, and the best part is the giving it away to someone special.

Do you have a busy creative May?

Anna
XO

Wednesday, June 6, 2012

A little promise

Hi everyone,

As mentioned in my last post (yes it has been a little while since I last wrote) I mentioned that I had another Star Wars inspired project in the making. Well now that it's finished and it has been passed on to it's new owner I can share it with you all...
.
.
.
.
.
.
.

I made a Yoda beanie!  My little nephew B was ecstatic when he received it.  I have even heard that he wears it constantly to kinder and is held in high praise by his friends because of it. Go B! May the force be with you!

The pattern for the beanie part is not my design, it comes from Knitted Critters for kids to wear.  I really love this as it's such a quick design to knit and it fits so well.  The pattern for the ears I was able to design myself and as a little gift to everyone I am going to share it with you.  My nephew can not be the only Star Wars fan out there and I am sure there are many people who would appreciate a Yoda beanie :)

Now this is the first time that I have ever written a pattern to share.  I have many at home (usually scribbled down on pieces of paper that only I seem able to decipher on a good day), so I hope that it reads right for you. 


Yoda Knitted Ears

Glossary:             M1 - make 1 stitch knit wise (knit into front & back of stitch)
                           K2 tog – knit 2 stitches together (put needle through back loop of both stitches),    
                              yarn over, pull though, then push both stitches off needle.

 Using a pair of 4mm needles & 8 ply wool, cast on 20 sts (leaving 30cm tail to sew onto beanie with).

Row 1: K 20
Row2:  P4, K12, P4 (20 sts)
Row 3: M1, K18, M1 (22 sts)
Row 4: P5, K12, P5 (22 sts)
Row 5: M1, K20, M1,  (24 sts)
Row 6: P4, K16, P4 (24 sts)
Row 7: K24
Row 8: M1, P3, K16, P3, M1 (26 sts)
Row 9: K26
Row 10: P4, K18, P4 (26 sts)
Row 11-20: Alternate between row 9 & 10, starting on row 9, ending on row 10
Row 21: K2tog, K22, K2tog (24 sts)
Row 22: P4, K16, P4 (24 sts)
Row 23: K2tog, K20, K2tog (22 sts)
Row 24: P4, K14, P4 (22 sts)
Row 25: K2tog, K18, K2tog (20 sts)
Row 26: P4, K12, P4 (20 sts)
Row 27: K2tog, K16, K2tog (18 sts)
Row 28: P4, K10, P4 (18 sts)
Row 29: K2tog, K14, K2tog (16 sts)
Row 30: P4, K8, P4 (16 sts)
Row 31: K2tog, K12, K2tog (14 sts)
Row 32: P4, K6, P4 (14 sts)
Row 33: K2tog, K10, K2tog (12 sts)
Row 34: P4, K4, P4 (12 sts)
Row 35: K2tog, K8, K2tog (10 sts)
Row 36: P10 (10 sts)
Row 37: K2tog, K6, K2tog (8 sts)
Row 38: P8 (8 sts)
Row 39: K2tog, K4, K2tog (6 sts)
Row 40: P6 (6 sts)
Row 41: K2tog, K2, K2tog (4 sts)
Row 42: P4 (4 sts)
Row 43: K2tog twice (2 sts)
Row 44: P2 (2 sts)
Row 45: K2tog

Fasten off and weave in end.  Once the ear is finished weave cast on edge thread along edge and bring out in the middle of the ear.  Fold ear in half (right sides facing) and slip stitch along edge for about 4-5 rows to form a crease. Take thread back to centre of ear, and with remaining thread sew ear onto beanie.

Repeat pattern for other ear.

A close up of the ear.

I hope that I have written this so that it is easy to follow but if you have any questions please let me know.

Enjoy!

Anna
XO